
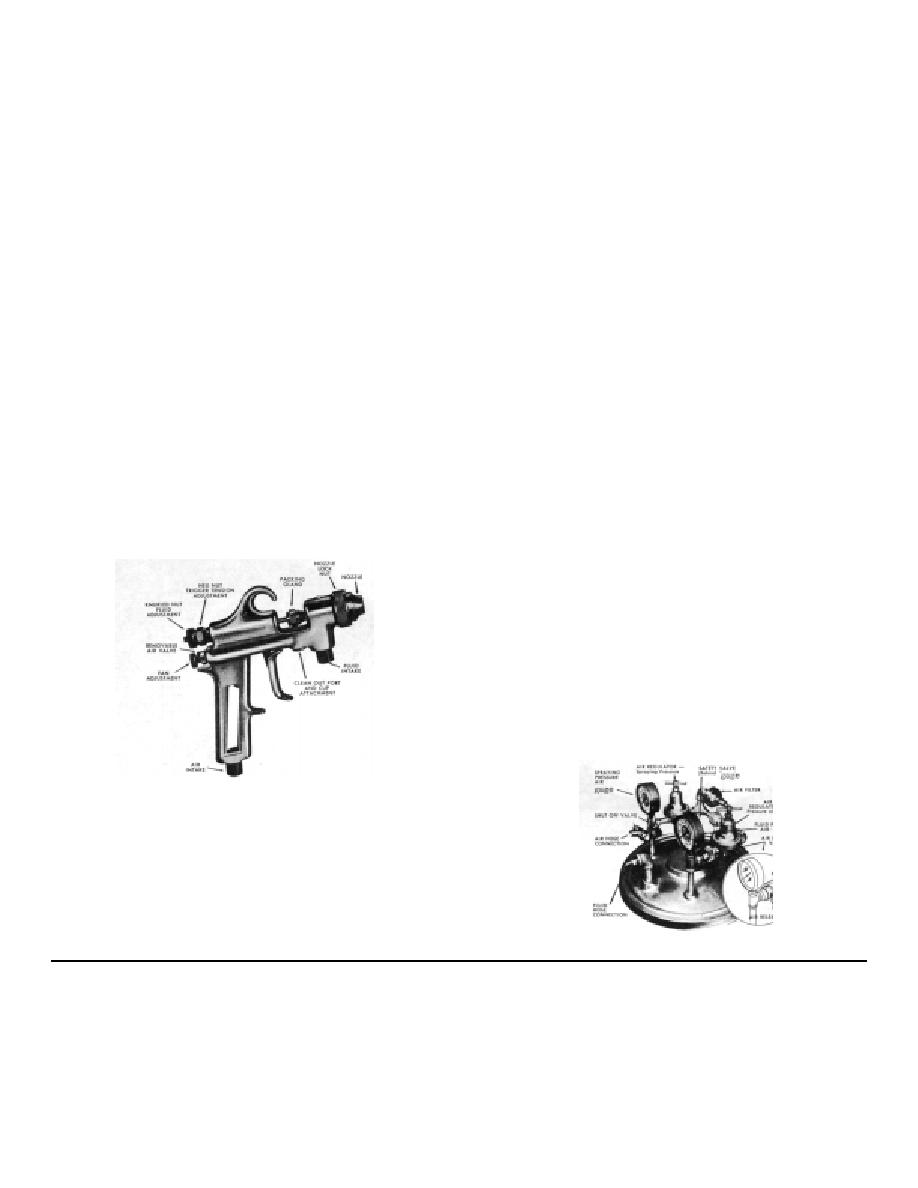
shown on the back of the gun. This control should be wide
INSTRUCTIONS
open when standard low pressure internal nozzles are used.
FOR OPERATING
Open air Shut-Off Valves. To determine proper
Low Pressure Spray Equipment
pressures begin by adjusting left hand regulator valve (Air
ASSEMBLY
Regulator-Spraying Pressure) to 20 lbs. Now with trigger
Unpack carefully. Guns, hose with connections, and
pulled bring the pressure on fluid (right hand regulator) up until
wrenches will be found in the tank.
the gun begins to spray. Increase atomizing pressure, then
Screw fluid tube into threaded hole in under side of
pressure on fluid until satisfactory results ore obtained. Keep
control head, beneath the word Fluid. Be sure this post is
the atomizing pressure as low as possible, increasing it only
tight, otherwise air will get into point line and cause a chatter
for greater speed or for heavy viscous materials. For final
or intermittent flow of point at the nozzle.
regulation of material flow, use fluid adjustment on back of
Connect main line air hose (red) to Air Filter.
gun.
Attach one end of paint hose (black) to connection
When working, hold gun six to eight inches from the
marked Fluid on cover. Attach other end of hose to front
object, at right angles to the surface. Point it directly at the
connection of gun shown as Fluid Intake in illustration below.
work and carry it along at a steady speed. Release trigger at
Attach one end of air hose (red) to red connection
the end of each stroke.
marked Air on cover. Attach other end of hose to air
A slight pull on the trigger emits air only, which can be
connection on gun grip, shown as Air Intake in illustration
used for dusting. Pull the trigger all the way back when
below.
painting.
Operation
A little experimenting will determine the correct pressures
Mix and strain material thoroughly.
Paint, varnish,
and speed for 'he work.
enamel, etc., should be at hand-brushing consistency. Nitro-
Cleaning-IMPORTANT
cellulose and synthetic
Open Air Release Valve on tank by pushing slide valve
lacquers spray at lighter consistency.
back (away from reg.) Wait until Fluid Pressure Air Gage reads
Pour material into container. It is not necessary to fill the
zero.
tank-a small container of material can be placed under the
Obstruct nozzle of gun with a rag and pull trigger. The
fluid tube. Hand tighten cover until tank is air-tight. DO NOT
spraying pressure will thus force point out of hose back into
USE TOOLS.
the container.
Close air Shut-Off Valve and Air Release Valve on
Place a small can of thinner in container under the fluid
control head by pushing slide valve forward (toward the Air
tube. Tighten cover. Close Air Release Valve. Close Shut-Off
Regulator-Pressure on Fluid). Note illustration for correct
Valve (red). Remove nozzle from gun. Pull trigger. Fluid
position.
pressure will force thinner through hose and gun, cleaning it
LOW PRESSURE GUN
satisfactorily. Again obstruct nozzle and pull trigger to blow
thinner back in container. Thinner can be saved for use in
reducing.
It is not necessary to disconnect gun from hose or
container, or to remove fluid tip when cleaning.
DO NOT SOAK GUN IN THINNER, as this dissolves the
grease and oil in the trigger action. A drop of oil should be
applied occasionally to the back of the gun and trigger action.
Difficulty may arise due to improper cleaning.
It is not necessary to take the gun apart to clean it. After
the day's work, take the fluid hose off the line and hang it up to
drain.
Take up on nut at Packing Gland periodically. If leak
does not stop, repack the gland.
Remove nozzle from gun.
Adjust right hand regulator (Air Regulator-Pressure on
Fluid) to apply pressure to container. This is the first
regulation of the flow of paint. With about 10 lbs. in the tank
pull the trigger all the way back (the Knurled Nut Fluid
Adjustment should be in the full open, clockwise position) until
fluid flows steadily from the fluid tip. Release trigger.
Put nozzle back on gun. If different spray widths are
required a variable width nozzle should be used (i.e. cone-
fan). Otherwise the nozzle which gives desired width is
recommended. External nozzles are sometimes required on
quick drying materials. The Fan Width Control for these is
NOTE
With internal atomization nozzles air and fluid pressures should be about equal. Not high air and low fluid
pressures as with external atomization high pressure equipment. With heavier materials or when spraying
at a height considerably above the pressure tank (25 ft. - 50 ft.) slightly higher fluid pressure may be
required.
CAUTION:
If atomizing air pressure is set too high, it will back pressure the fluid and starve the gun. Conversely, too
high a fluid pressure may cause paint to back up into air lines and clog the gun.
1
